Overview
Welcome to Propper for Salesforce Beta! This guide walks you through setting up Propper for Salesforce in your org. The package includes Propper Sign (eSignature) and Propper Gen (document generation), with an optional Agentforce add-on for sending and status from a conversational agent.
Prerequisites
Before beginning the setup process, ensure you have:
System Requirements
- Salesforce Edition: Enterprise, Unlimited, Developer, or Performance. During the beta, install in a sandbox, Developer Edition, or scratch org (not production; see Installation).
- API Version: 65.0 or higher
- User Permissions: System Administrator access
- Browser: Chrome, Firefox, Safari, or Edge (latest versions)
Account Requirements
- Propper Subscription: An active subscription with access to Propper Sign and Propper Gen
- Connection: You connect Propper to Salesforce with OAuth during setup. There are no API keys to copy.
Technical Requirements
- Connection: The Setup Wizard configures the secure connection to Propper for you (no manual endpoint setup required)
- Permission Sets: Ability to assign user permissions
Installation
Step 1: Install the Propper Beta Package
Beta packages cannot be installed in a production org. Install the beta in a Developer Edition org, a sandbox, or a scratch org. Once Propper promotes the package to a released version, it can be installed in production.
Open the installation URL for your org type, then follow "Complete the installation" below.
Developer Edition orgs
https://login.salesforce.com/packaging/installPackage.apexp?p0=04tg5000000CvP7AAKSandbox orgs
https://test.salesforce.com/packaging/installPackage.apexp?p0=04tg5000000CvP7AAKScratch orgs
-
Get the instance URL: run
sf org display --target-org [your-scratch-org-alias]and copy the Instance URL. -
Open the installation URL: replace
login.salesforce.comwith your scratch org's instance URL:
https://[your-instance-url]/packaging/installPackage.apexp?p0=04tg5000000CvP7AAK
Note: The package ID is the same for all org types; only the domain changes.
Complete the installation
-
Choose installation options:
- Install for Admins Only: Recommended for initial setup
- Install for All Users: Choose after completing setup
- Install for Specific Profiles: Advanced option for controlled rollout
-
Grant access:
- Approve access to the third-party websites when prompted
- Review and accept the terms
-
Complete the installation:
- Click "Install" and wait for completion
- You'll receive an email confirmation when installation is complete
Step 2: Verify Installation
-
Check Installed Packages:
- Navigate to Setup > Installed Packages
- Verify "Propper for Salesforce" is listed and active
-
Verify Access:
- In the App Launcher, confirm the "Propper Setup" and "Propper Admin" tabs are available
-
Confirm the
Propper_Admin(all Propper products),Propper_User(Sign and Gen for end users), andPropper_Agent(for the optional Agentforce add-on) permission sets are present
Setup Wizard
Accessing the Setup Wizard
After installation, use the guided Setup Wizard to configure the package:
-
Navigate to the Setup Wizard:
- Go to App Launcher > search for "Propper Setup"
- Open the "Propper Setup" tab
- Follow the steps: the wizard guides you through nine steps. Optional steps can be skipped and revisited later.
Step 1: Welcome
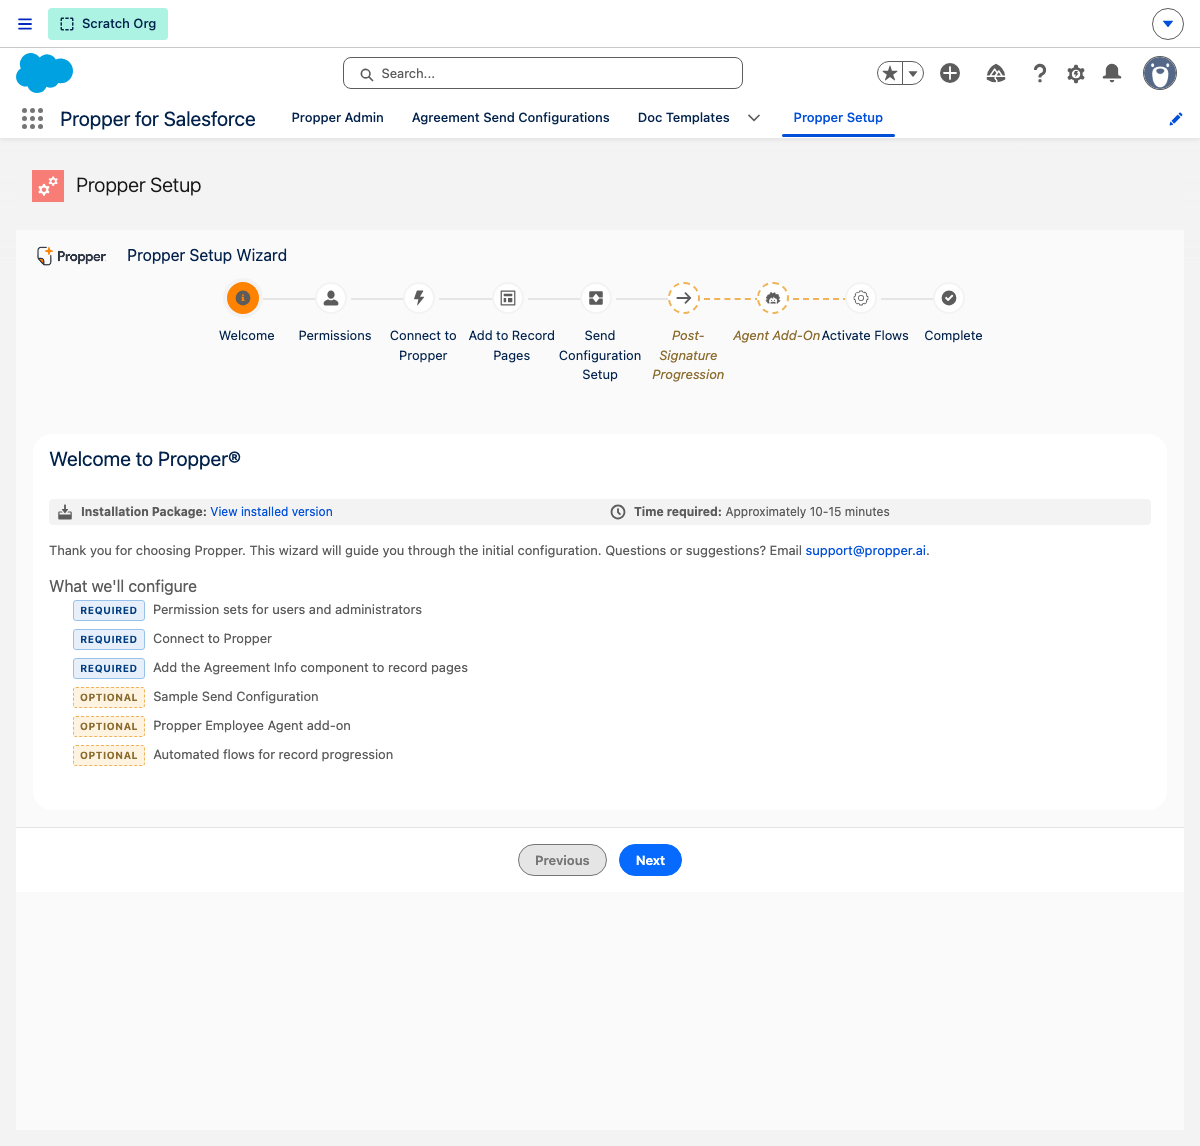
- A quick overview of what the wizard configures.
Step 2: Permissions
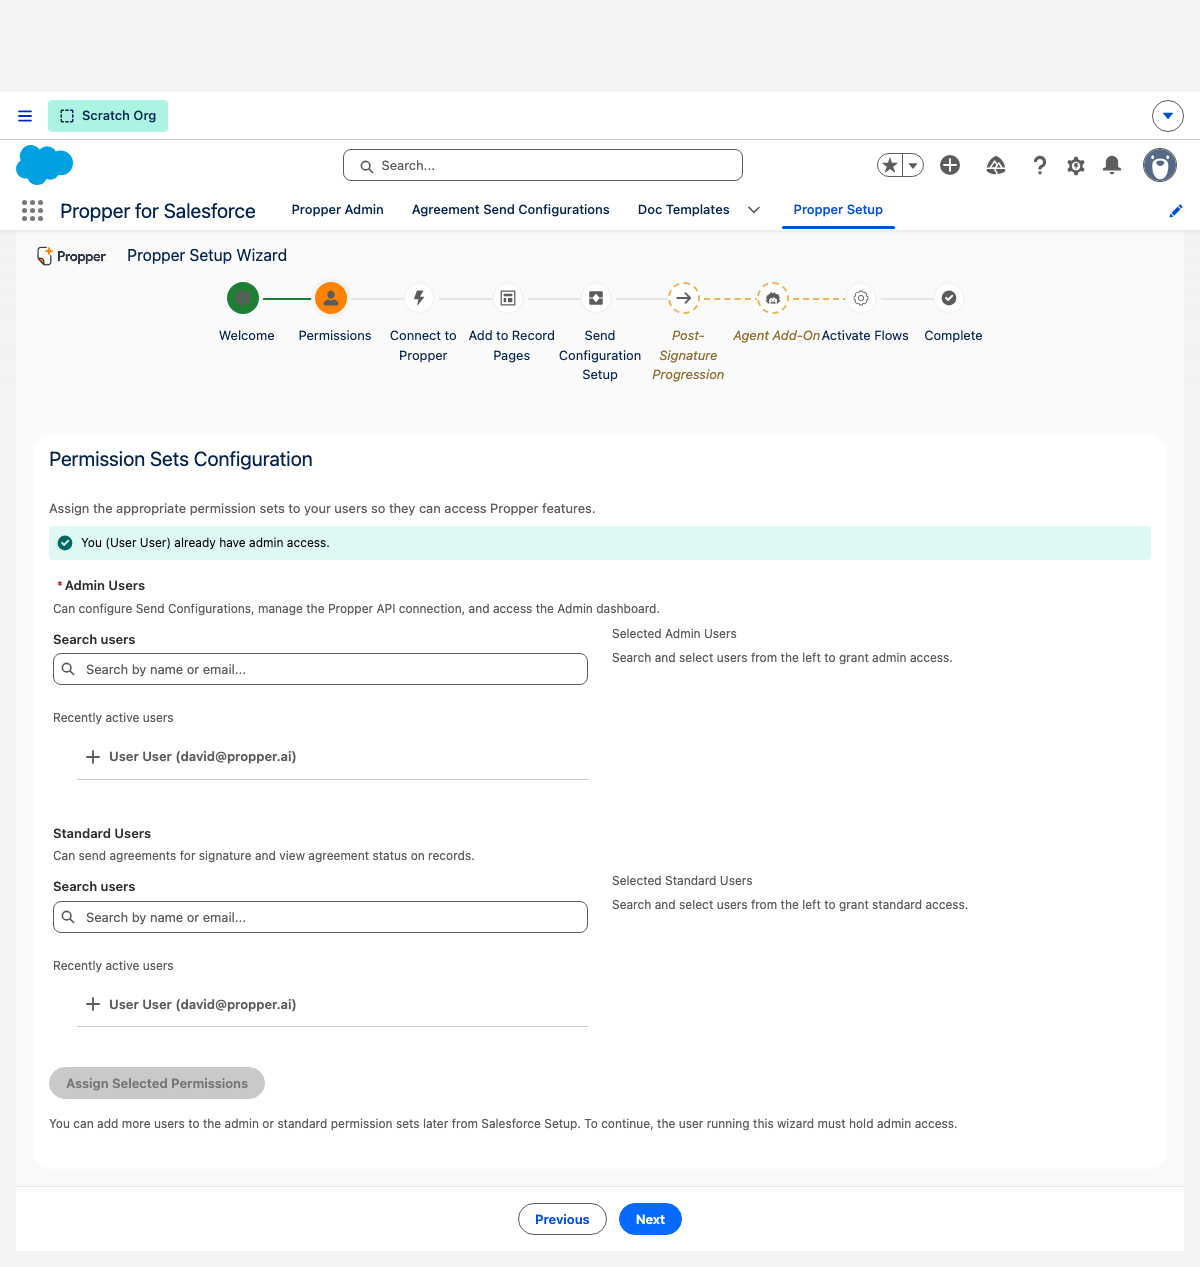
- Purpose: Grant users access to Propper.
-
Actions:
-
Select admin users for the
Propper_Adminpermission set (manages all Propper products) -
Select end users for the
Propper_Userpermission set (Sign and Gen) - If you do not yet hold admin access, use "Add myself as Admin"
-
Select admin users for the
- Note: Selections are assigned automatically when you continue, so you do not lose them by moving on.
Step 3: Connect to Propper
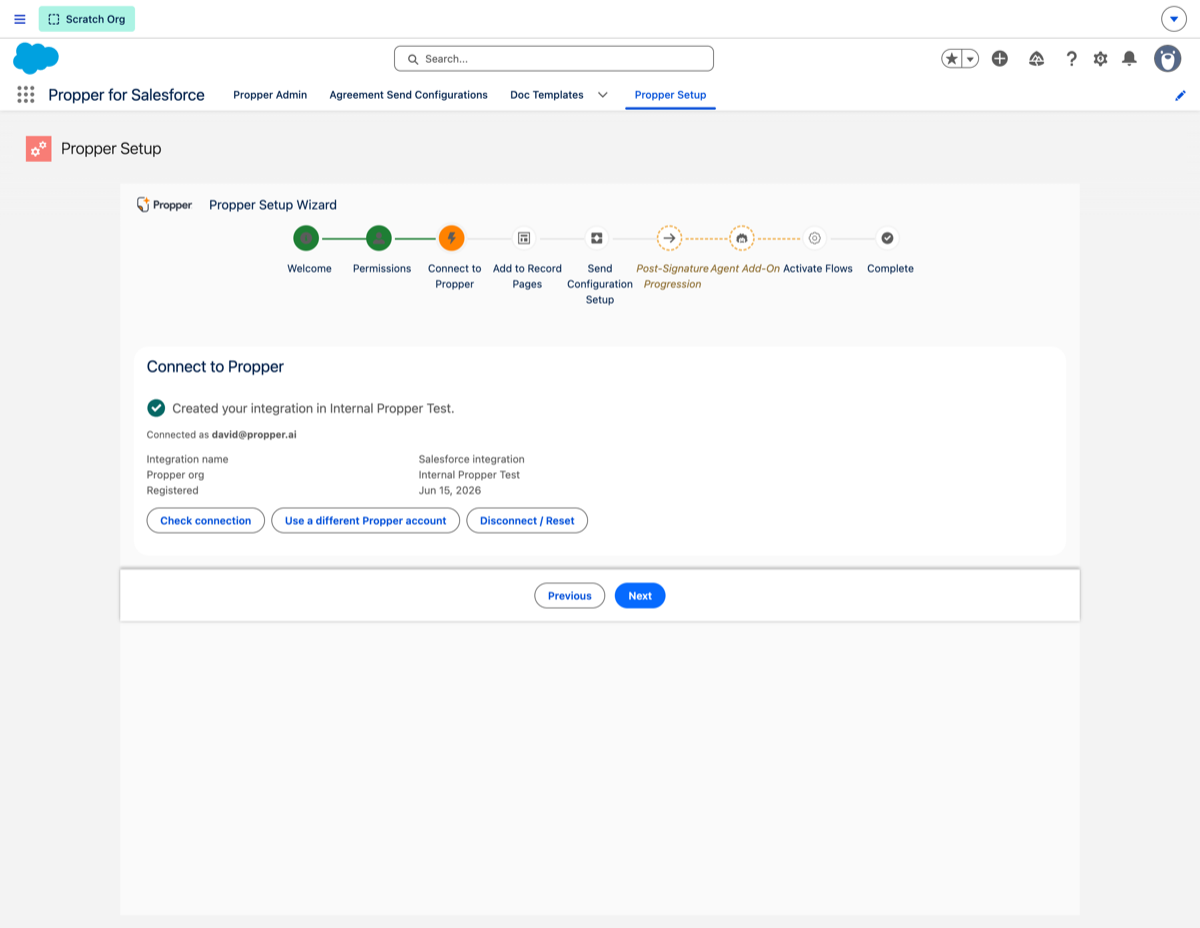
- Purpose: Securely connect your Salesforce org to Propper.
- How: Connect using OAuth. There are no API keys to enter; the wizard configures the secure connection for you.
Step 4: Add to Record Pages
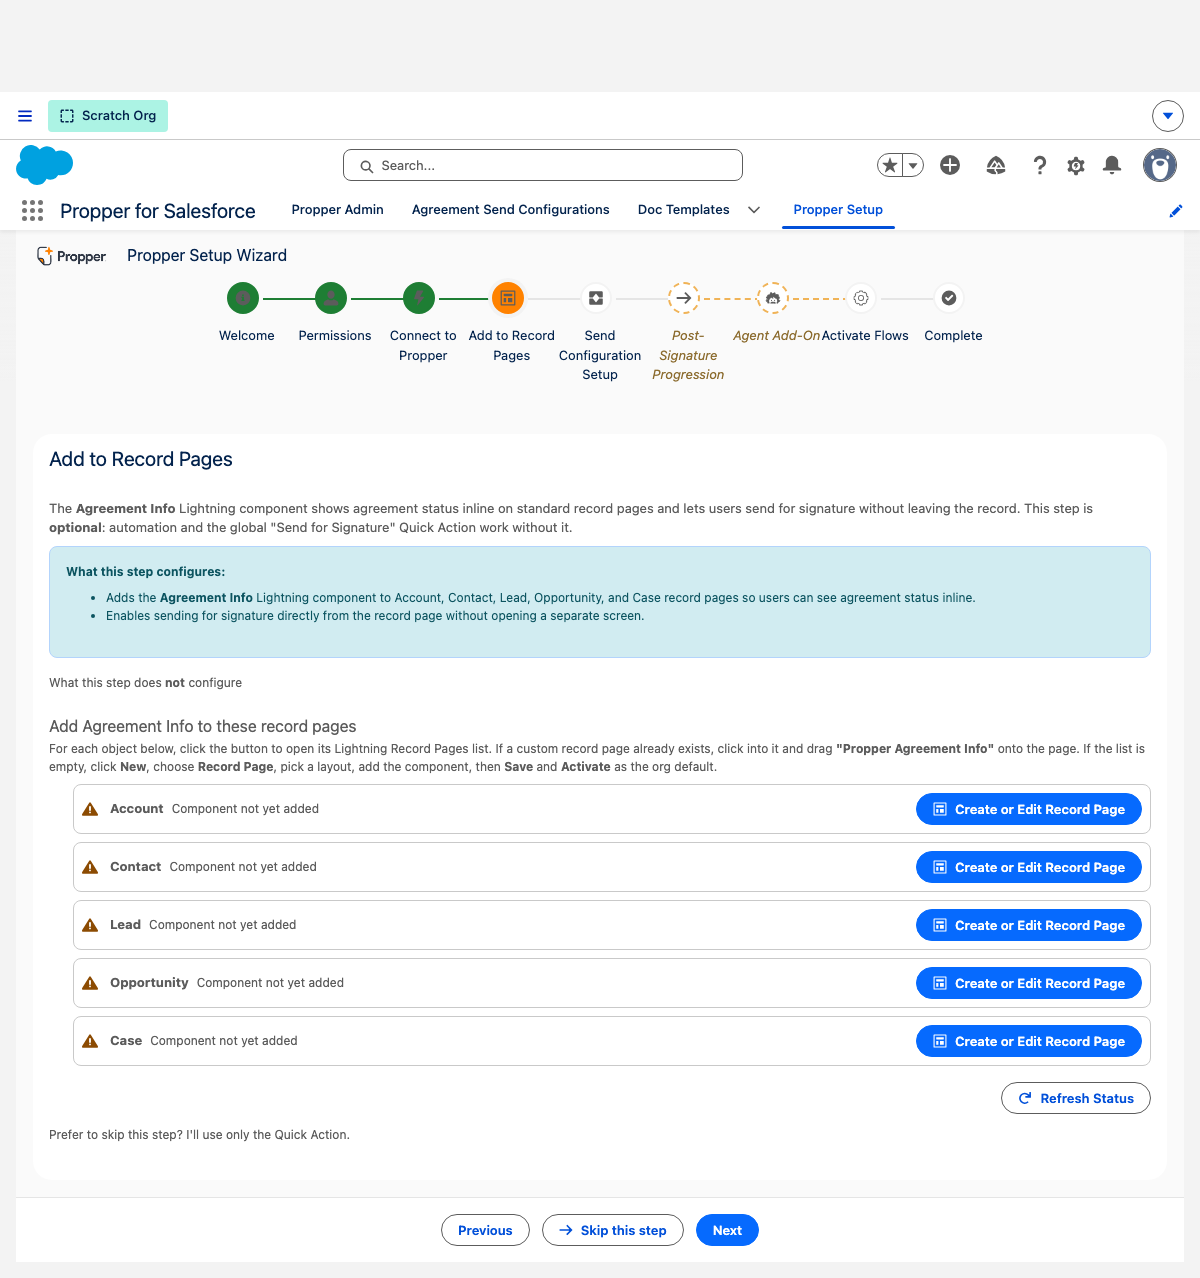
- Purpose: Add the Propper components to your record pages so users can send and track agreements from a record.
- Optional: A Quick Action is also available, so this step can be skipped. You can re-enable it later.
- Supported Objects: Account, Contact, Lead, Opportunity, Case
Step 5: Send Configuration Setup
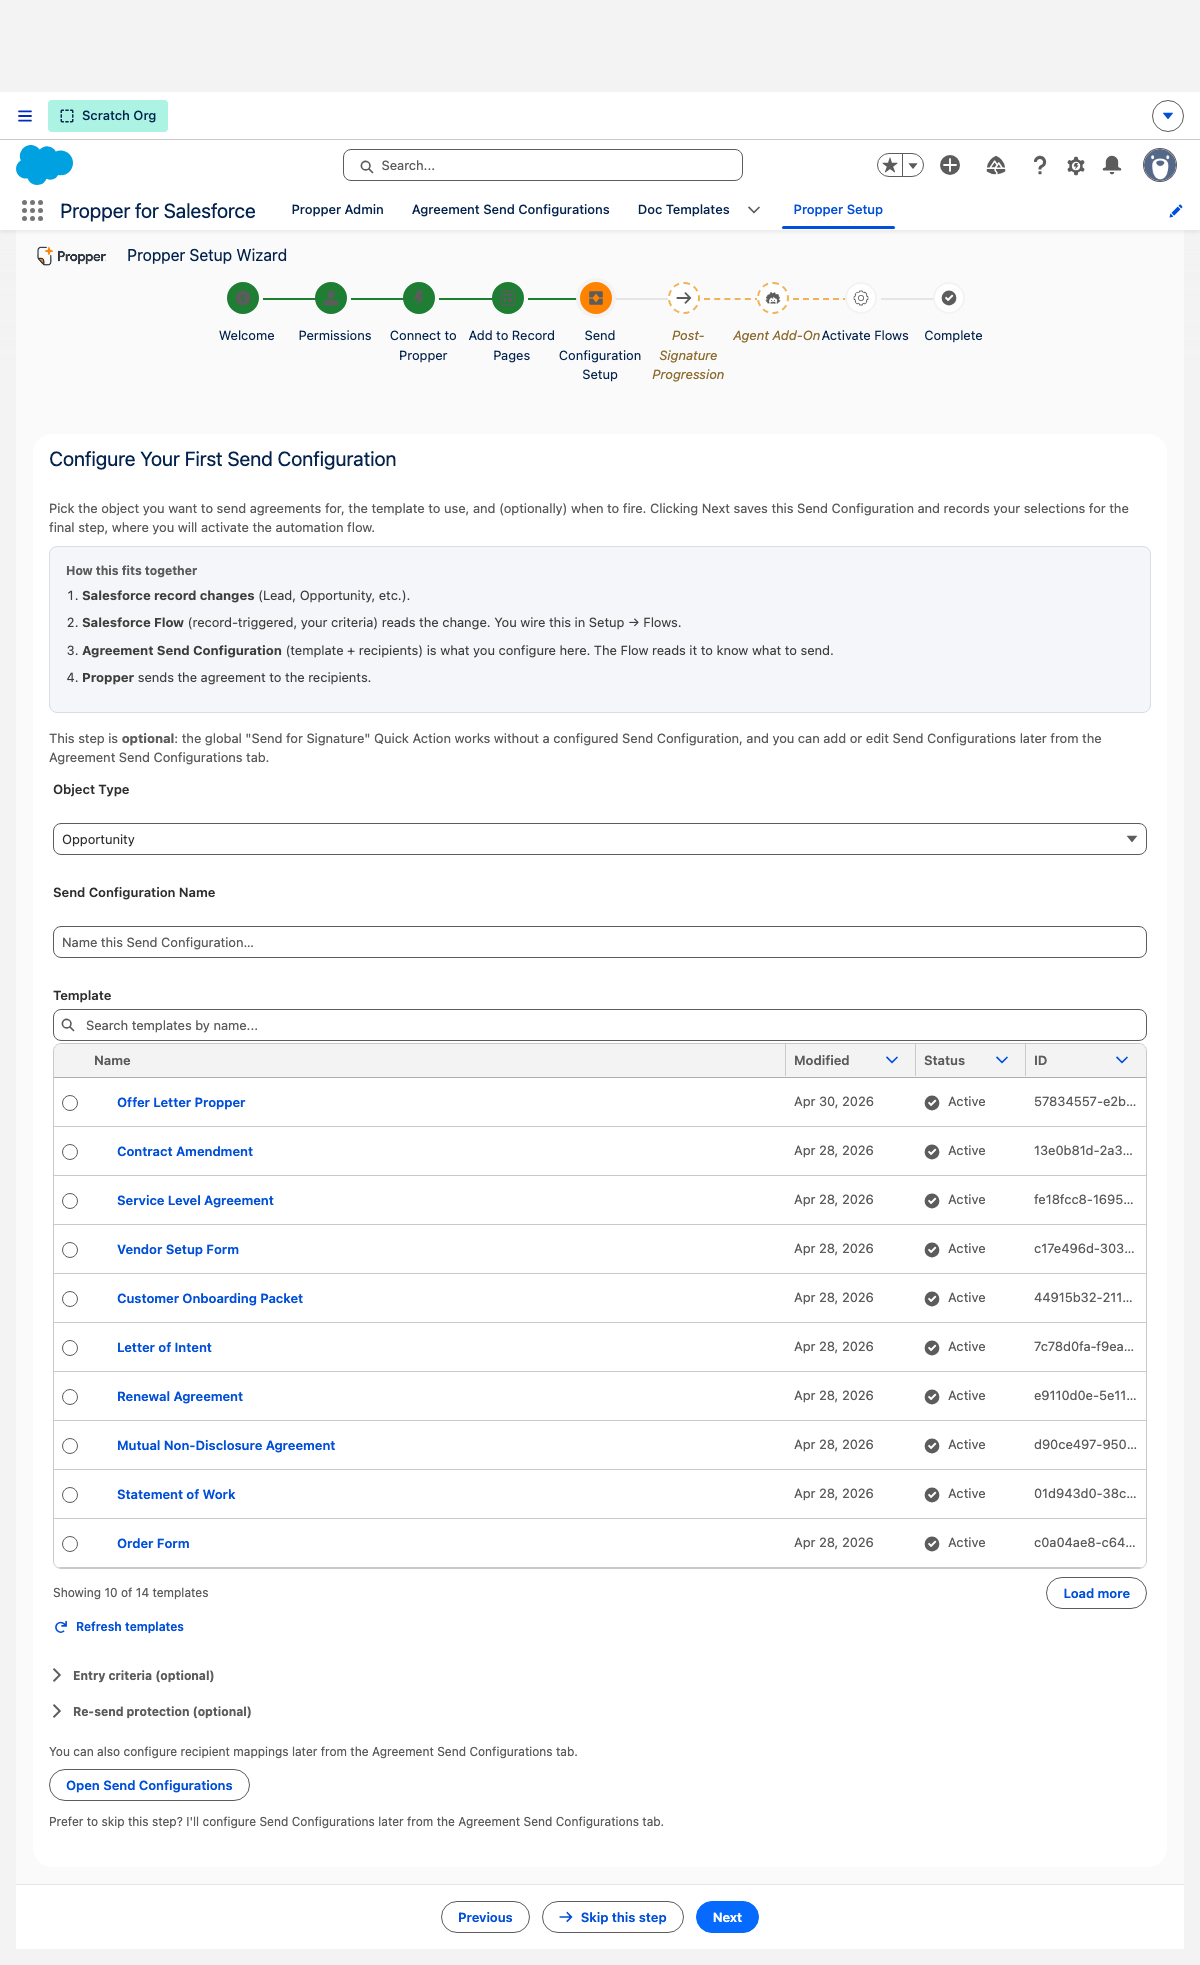
- Purpose: Define how agreements are sent. A Send Configuration ties an object to a template and its recipients.
-
Configuration:
- Select the object type (Account, Contact, Lead, Opportunity, Case)
- Name the Send Configuration
- Choose a template from your Propper account
- Map recipients to people on the record, specific users, or literal emails
- Optionally set entry criteria and re-send protection
- Note: "Send Configuration" is the package's term for this setup; it is distinct from a Salesforce record-triggered Flow. This step can be skipped and completed later from the Agreement Send Configurations tab.
Step 6: Post-Signature Progression
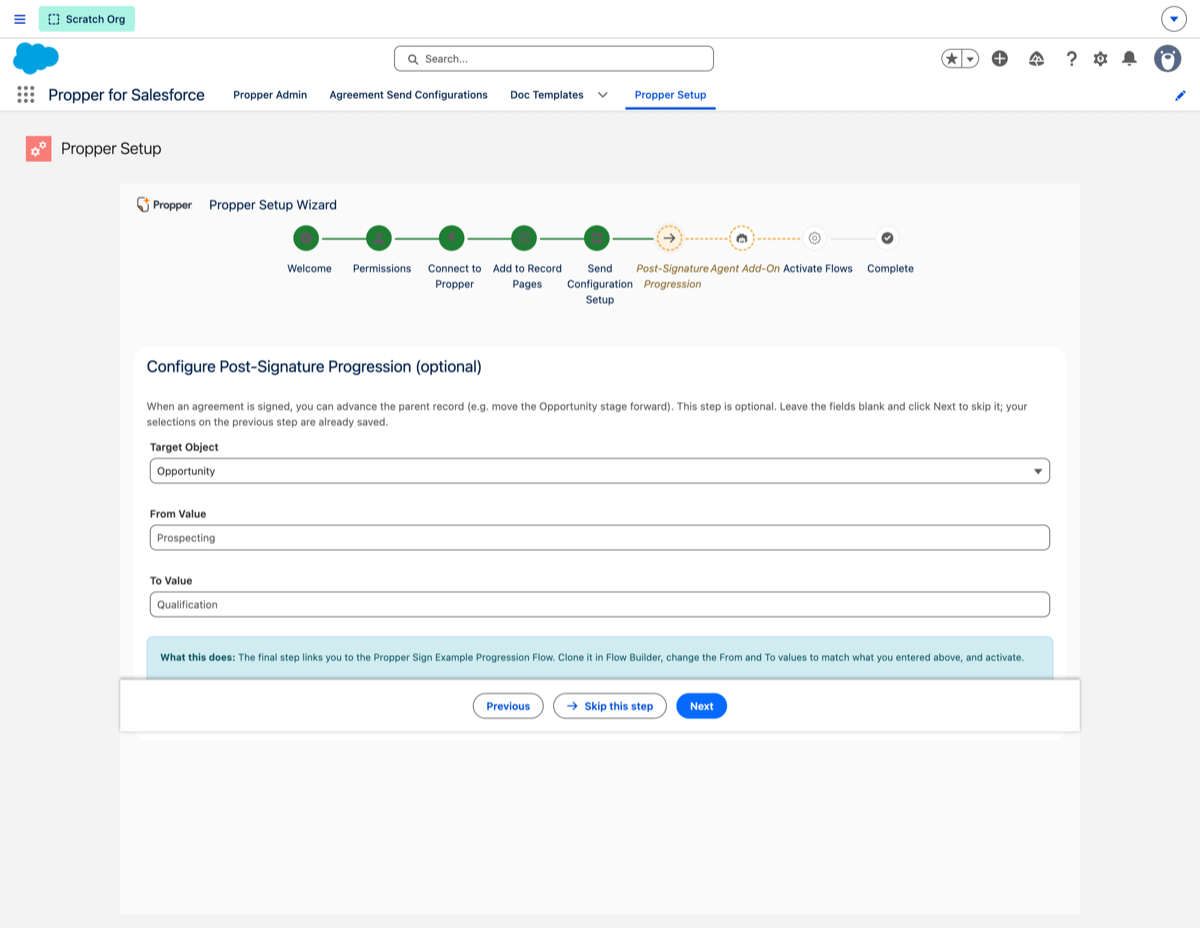
- Purpose: Optionally move a record forward automatically once its agreement is signed (for example, advancing an Opportunity stage).
- Optional: Leave blank to skip; you can configure it later.
Step 7: Agent Add-On (optional)
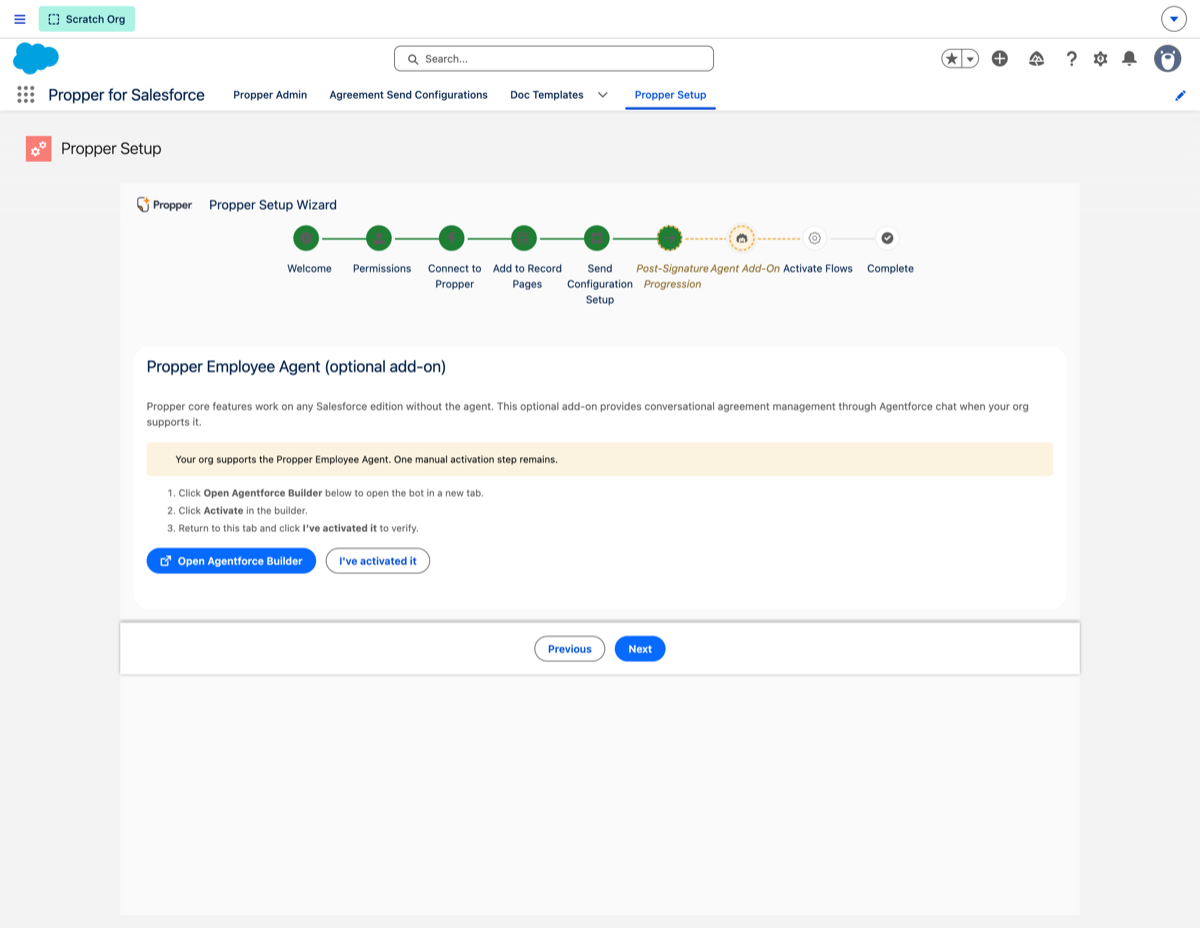
- Purpose: Enable the optional Agentforce add-on so users can send agreements and check status from a conversational agent.
- Requirements: Agentforce must be available in your org. If it is not, this step explains what is needed; core Sign and Gen features work without it.
-
Permission set: Users who interact with the agent also need the
Propper_Agentpermission set.
Step 8: Activate Flows
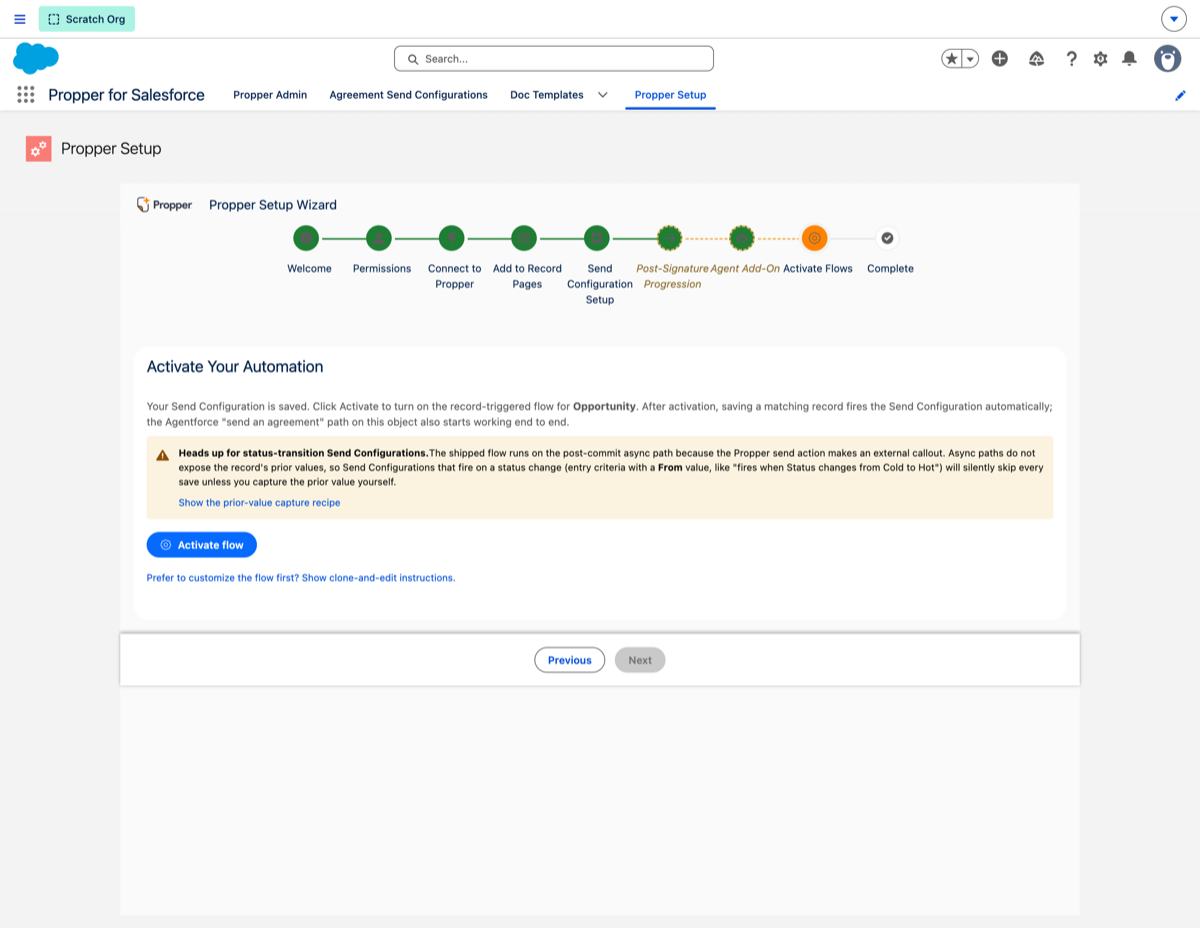
- Purpose: Turn on the automation that runs your Send Configurations.
- How: For Lead and Opportunity, activate with one click. For other objects, follow the guided steps to clone and activate the example flow.
Step 9: Complete
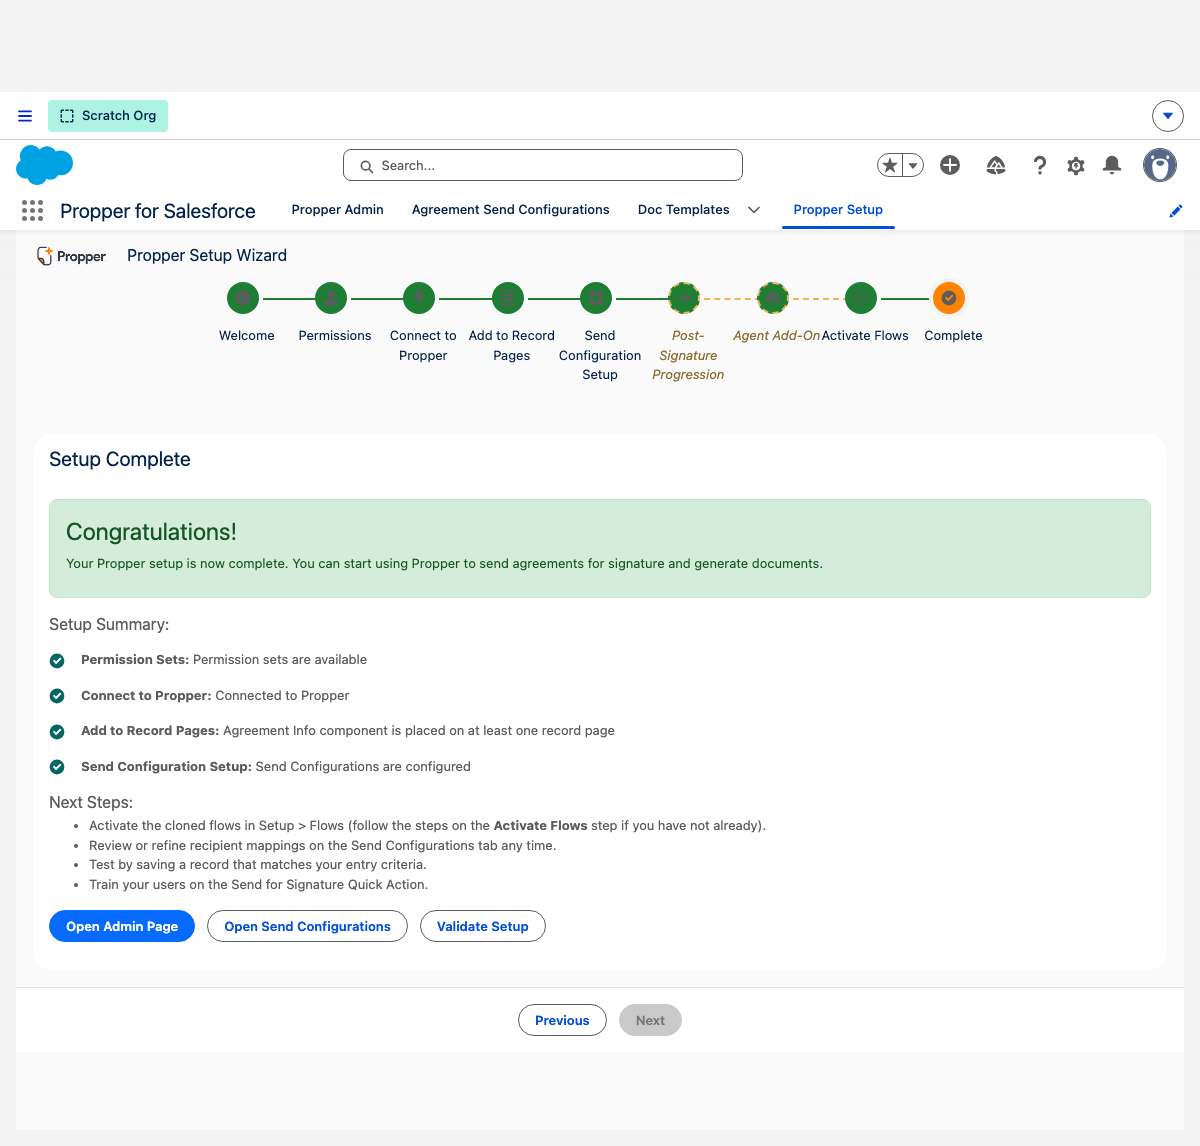
- Review the setup summary, including the status of each step.
Manual Setup Instructions
Most admins use the Setup Wizard. If you prefer to configure manually, the same building blocks apply:
1. Connect to Propper
- Open App Launcher > "Propper Setup" > Connect to Propper.
- Connect using OAuth. The connection is configured for you; there are no API keys to enter into Salesforce.
2. Assign Permission Sets
-
Navigate to Permission Sets:
- Setup > Permission Sets
-
Select
Propper_Admin,Propper_User, orPropper_Agent
-
Assign to Users:
- Click "Manage Assignments" > "Add Assignments"
- Select the appropriate users and click "Assign"
3. Configure Record Pages
-
Navigate to Lightning App Builder:
- Setup > User Interface > Lightning App Builder
- Edit the record pages where you want to show agreement information
-
Add the Propper component:
- Drag the Propper agreement component onto the record page
- Configure the component settings as needed, then activate the page
4. Create a Send Configuration
- Open the Agreement Send Configurations tab from the Propper app.
- Define the object, template, recipients, and delivery method, then save. This is the same configuration the wizard's Send Configuration Setup step creates.
Post-Setup Configuration
1. Create Send Configurations
- Open the Agreement Send Configurations tab from the Propper app and create a new configuration.
-
Configure the details:
- Name: A descriptive name
- Template: Select from your Propper templates
-
Delivery Method:
Senddispatches the agreement to recipients immediately (the default);Draftcreates the agreement but holds it for the sender to review and release - Recipients: Map Salesforce fields to the agreement recipients
2. Map Send Configurations to Objects
- Choose which Send Configurations apply to each object type.
- Optionally configure phase-specific routing (for example, by Opportunity stage).
3. Test the Integration
- Create a test record (Account, Contact, or Opportunity) with contact information.
-
Send a test agreement:
- Open the test record and click the "Send for Signature" action
- Select a Send Configuration and send the agreement
-
Verify:
- Check email delivery and the signing process
- Confirm the agreement status updates in Salesforce
- Confirm the agreement information displays on the record page
Document Generation (Propper Gen)
Propper Gen generates documents from your templates directly on a Salesforce record, merging the record's data into the document. A user generates from the record they are already on, and the finished PDF is saved to that record's Files. If the template includes signature fields, you can send the generated document for signature in the same flow (Gen + Sign).
Before you start
-
Permission set: Users need
Propper_User(orPropper_Admin), assigned in the Setup Wizard's Permissions step. - A document template: Each template is set up by an admin, scoped to a Salesforce object, with its merge tags mapped to record fields. Templates are managed in the Doc Templates area and registered in Salesforce before they appear in the Generate Document card.
- The Generate Document action: Add the "Generate Document" Quick Action (or the Document Generation component) to the record pages where you want it. The Setup Wizard's "Add to Record Pages" step does this, or you can add it in Lightning App Builder.
- Supported objects: Account, Contact, Lead, Opportunity, and Case.
Generate a document
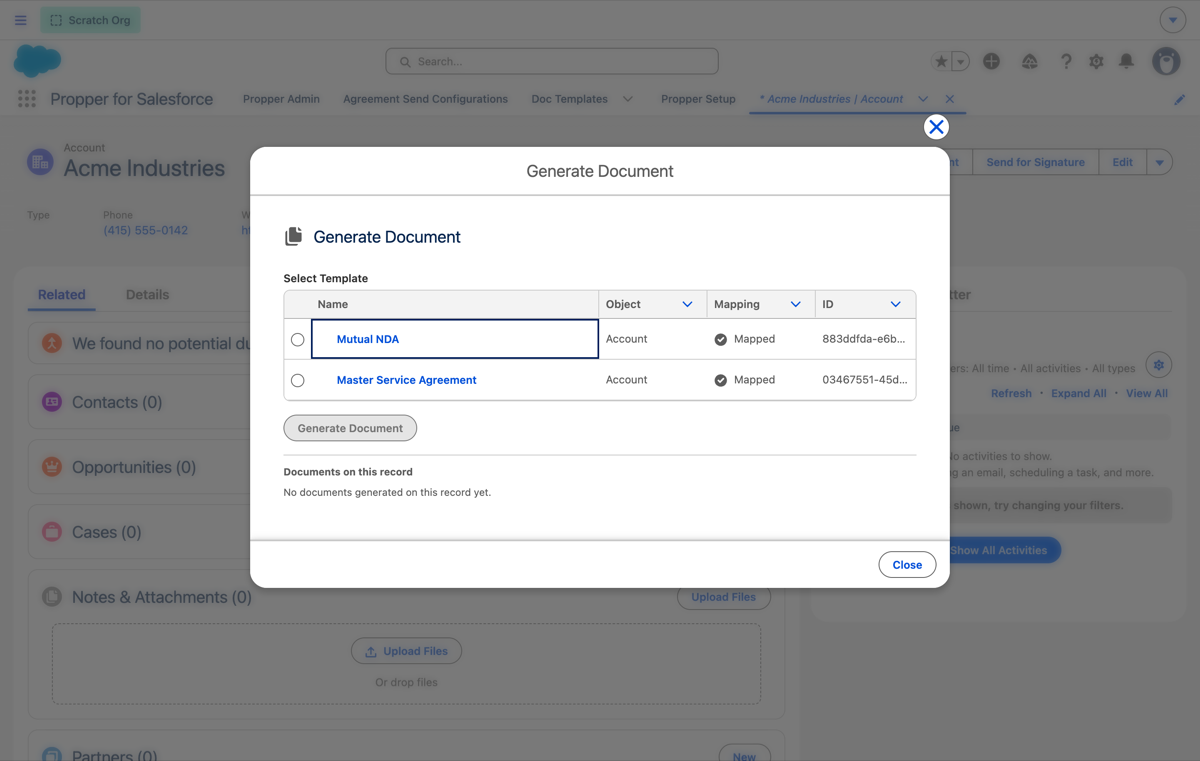
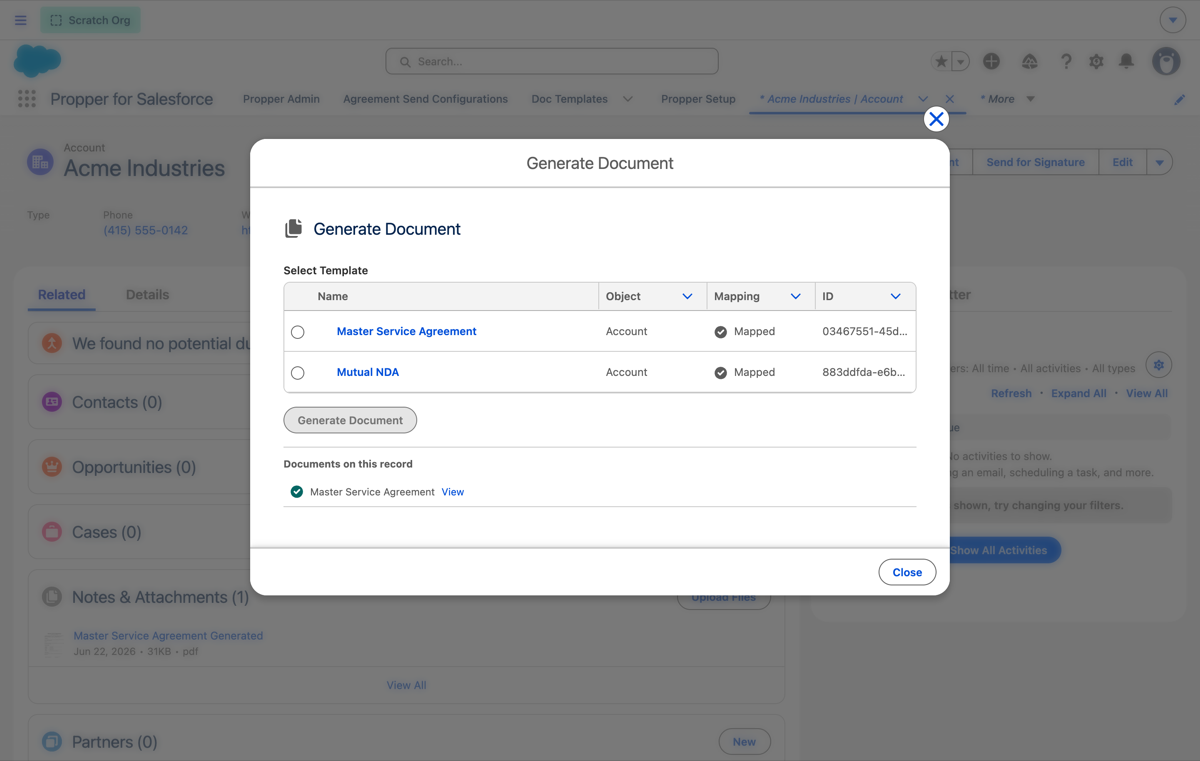
- Open a record (for example, an Account) and click Generate Document.
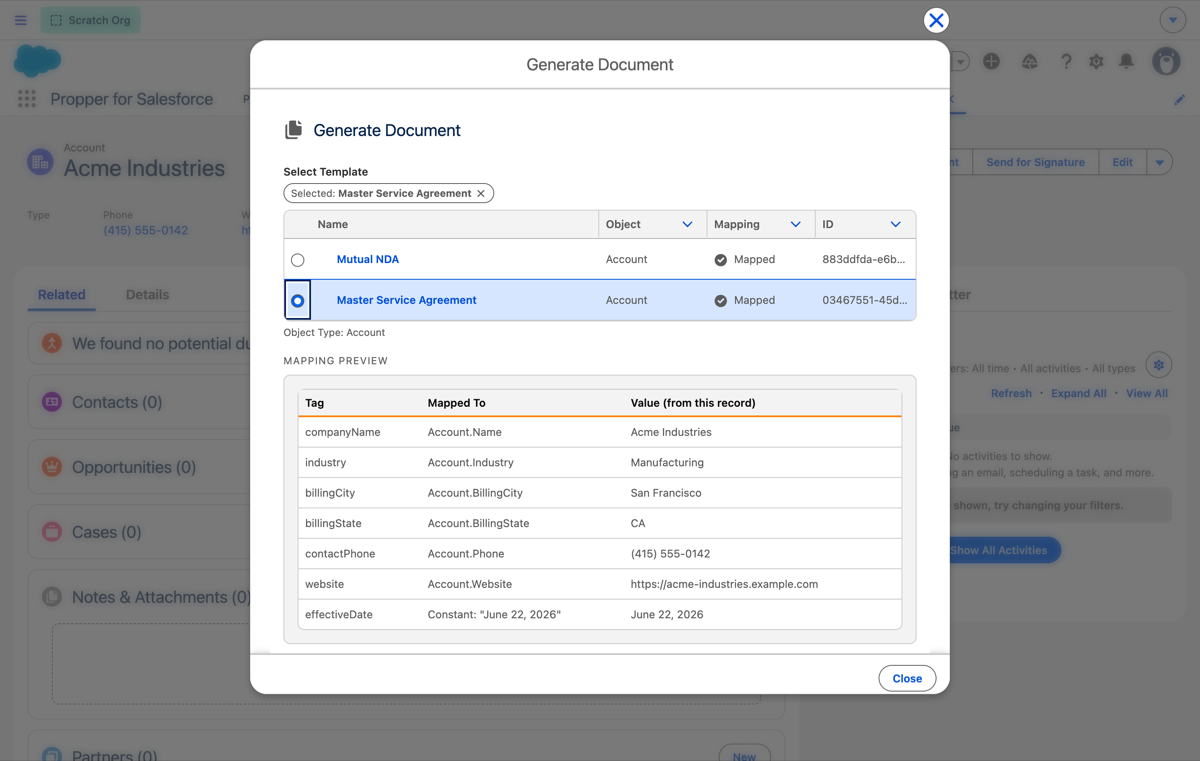
- Choose a template. The picker lists the templates mapped to that object.
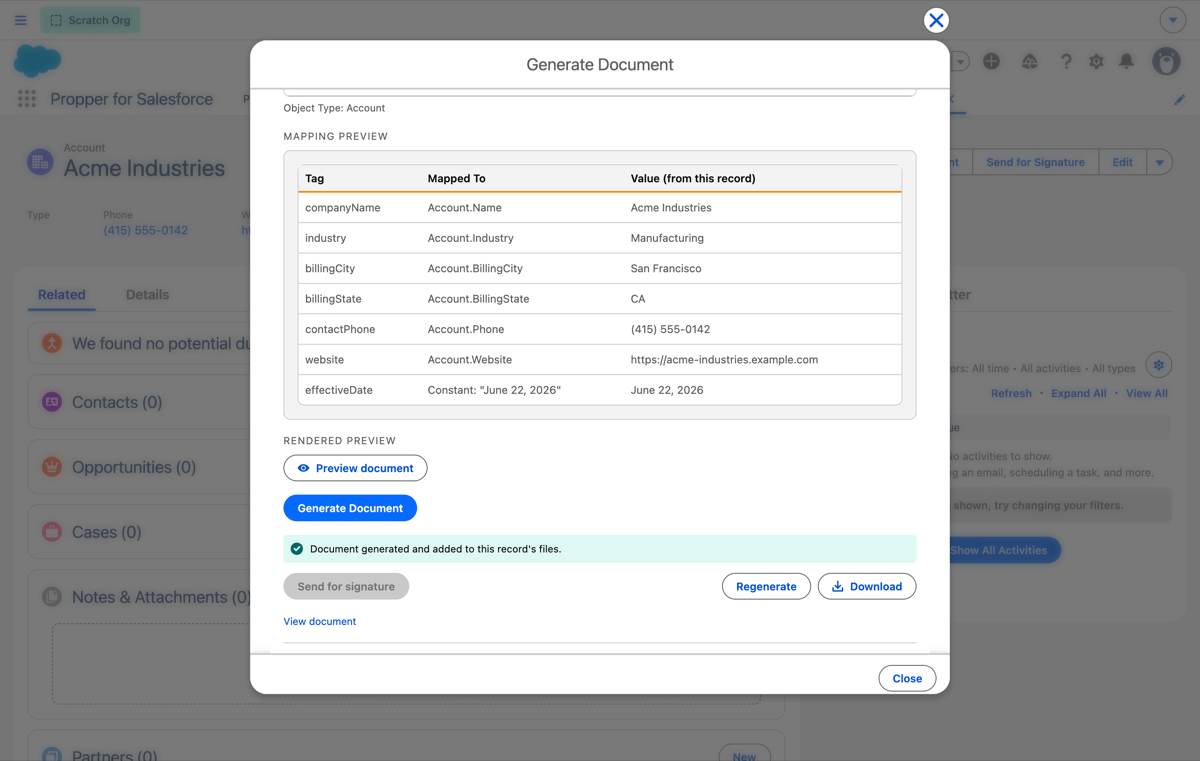
- Review the field mapping. The mapping preview shows each merge tag, the Salesforce field it maps to, and the value resolved from this record.
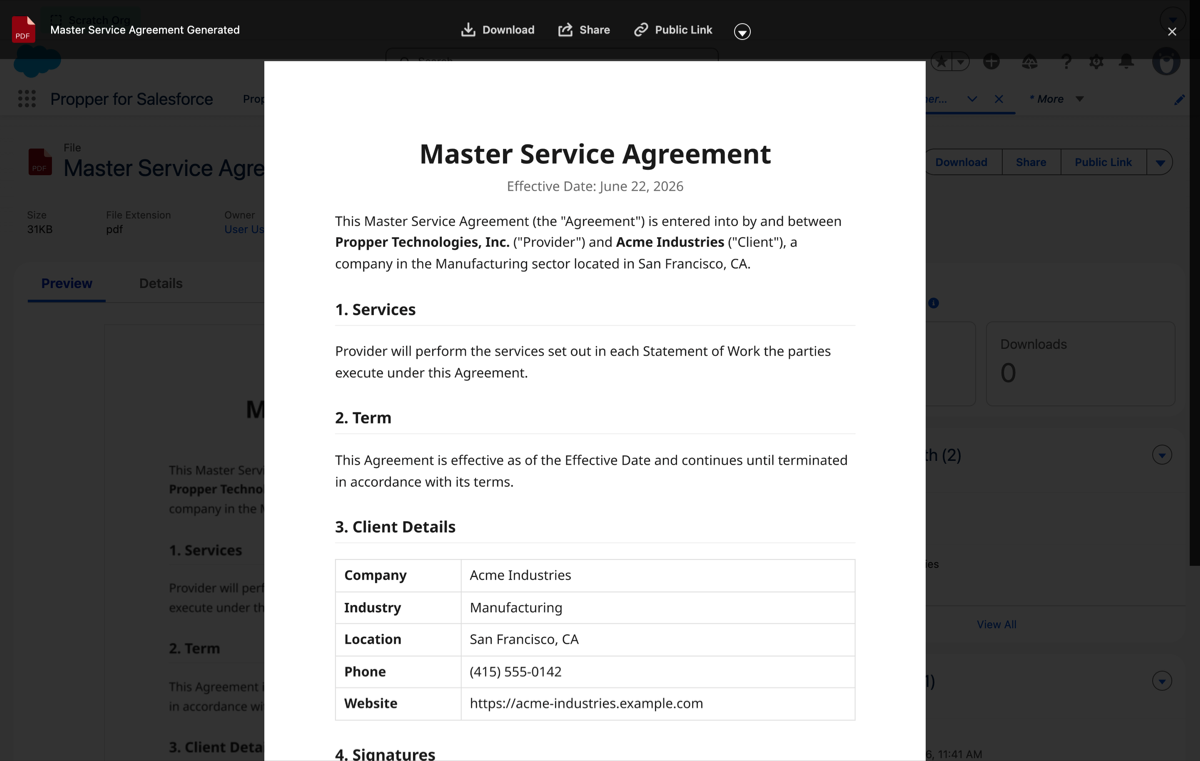
- (Recommended) Preview the document. Click "Preview document" to open the rendered document in a new tab. The card confirms when every field resolves, so you can catch an unmapped field before generating.
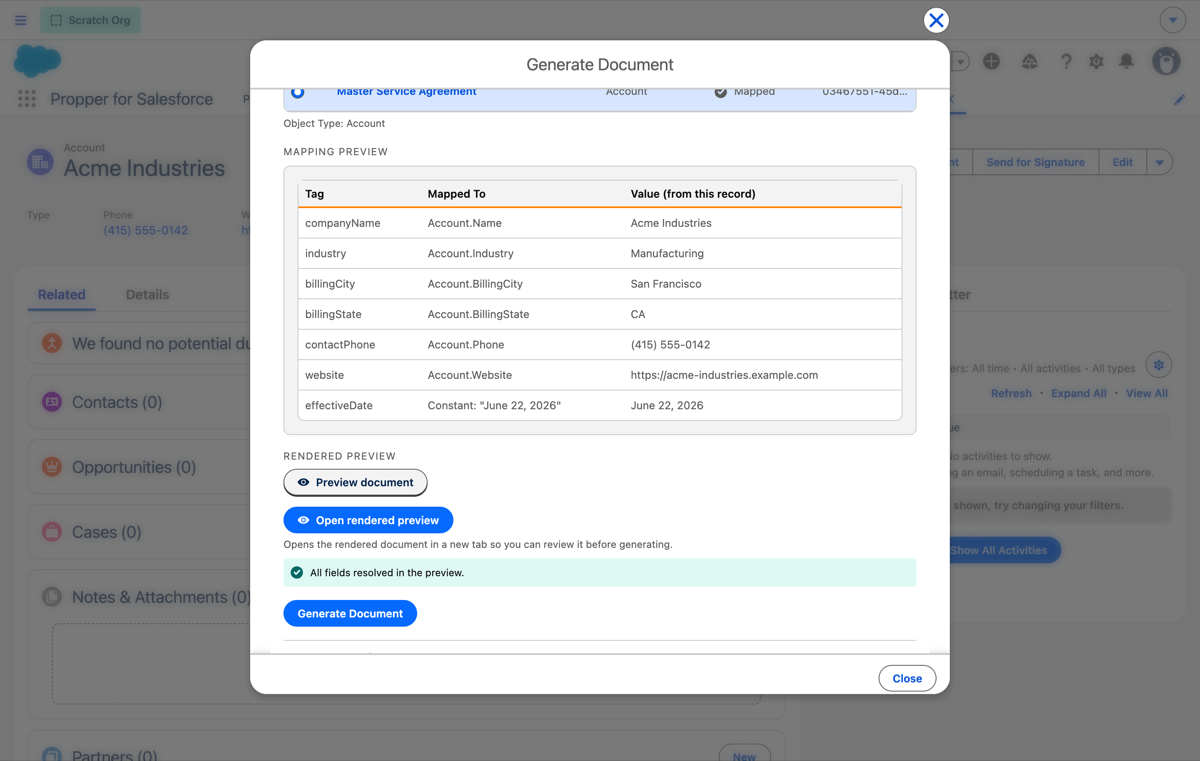
- Generate. Click "Generate Document." Propper creates the PDF and adds it to the record's Files, with options to send it for signature, regenerate, or download.
Send the generated document for signature (Gen + Sign)
When the template includes signature fields, the result panel's Send for signature button is enabled. Click it to map each signer role to a recipient (a person on the record, a specific user, or a literal email), then send. The recipients are resolved against the record when you send.
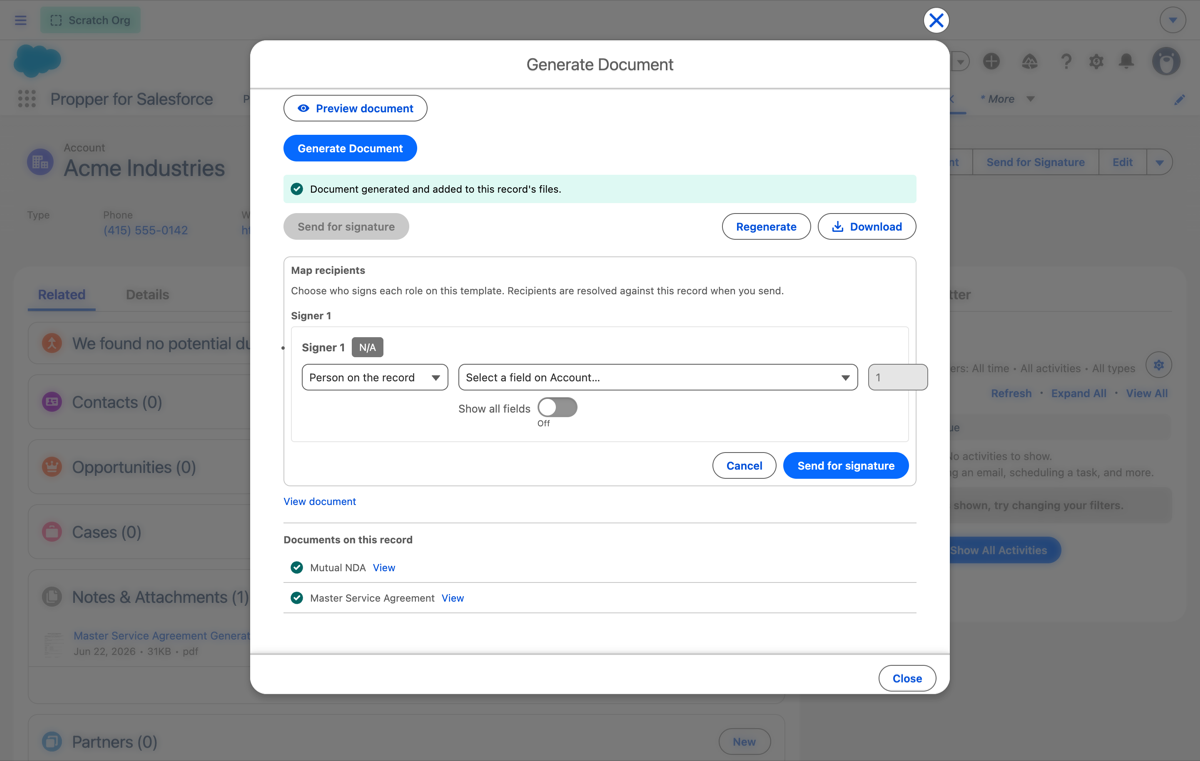
If the button is disabled, the selected template does not carry signature fields. Add them to the template in Propper, then generate again.
Documents generated on a record
The Generate Document card lists the documents already generated on the current record, each with a link to view it.
Automate generation (optional)
To generate documents without a manual step, add the Generate Document invocable action to a record-triggered Flow (for example, on an Opportunity stage change). The action writes the same audit entry and links the document to the record. This release generates one document per record; runs beyond the per-invocation limit are skipped rather than silently dropped.
Notes and limits
- Generated output is PDF in this release.
- Supported objects: Account, Contact, Lead, Opportunity, and Case.
- The rendered preview depends on your Propper plan; if it is unavailable, you can still generate.
- Send for signature requires the template to include signature fields.
- Tip: Preview before generating. The preview flags any tag that has no mapping, so an unmapped field does not render blank in the final document.
Testing Your Setup
Test Checklist
- Permission Assignment: Verify users can access the Propper components
- Connection: Confirm the OAuth connection to Propper succeeds
- Template Loading: Verify templates load from Propper
- Send Configuration: Create and save a Send Configuration
- Document Generation: Generate a document from a template (Propper Gen)
- Record Page Setup: Add the Propper agreement component to a record page
- Signature Request: Send a test agreement for signature
- Status Tracking: Verify agreement status updates in Salesforce and on record pages
Common Test Scenarios
-
Basic Agreement:
- Create an Opportunity with a Contact
- Send for signature using a configured Send Configuration
- Verify email delivery and the signing process
- Check the agreement status on the record page
-
Multi-Recipient Agreement:
- Configure a Send Configuration with multiple recipients
- Test recipient ordering
- Verify all recipients receive their requests
-
Phase-Specific Routing:
- Map different Send Configurations to different Opportunity stages
- Test stage transitions
- Verify the correct Send Configuration is selected
Troubleshooting
Common Issues
1. Connection Problems
Symptoms: Cannot load templates, connection errors
Solutions:
- Re-run Connect to Propper in the Setup Wizard
- Confirm the OAuth connection completed successfully
- Confirm your Propper subscription is active
2. Permission Issues
Symptoms: Users cannot access components
Solutions:
- Verify permission sets are assigned correctly
- Check object and field permissions
- Ensure tab visibility is configured
3. Send Configuration Issues
Symptoms: Send Configurations do not appear in the action
Solutions:
- Complete Send Configuration Setup for the object
- Check the object type mapping
- Confirm the automation flow for the object is active
4. Email Delivery Problems
Symptoms: Recipients do not receive signature requests
Solutions:
- Check the delivery method on the Send Configuration
- Verify recipient field mappings
- Ensure email addresses are valid
5. Record Page Component Issues
Symptoms: The Propper agreement component is not displaying
Solutions:
- Verify the component is added to the record page
- Check component permissions
- Ensure the record page is activated
Error Messages
| Error | Cause | Solution |
|---|---|---|
| "The external credential isn't fully configured" | The OAuth connection is incomplete | Re-run Connect to Propper and complete the connection |
| "Permission denied" | Missing permission sets | Assign the appropriate permission set |
| "Template not found" | Template no longer exists in Propper | Verify the template exists in your Propper account |
| "No Send Configuration found" | Send Configuration Setup not completed for the object | Create a Send Configuration for the object |
Log Files and Debugging
-
Enable Debug Logs:
- Setup > Debug Logs
- Create a log for the affected user
- Set the log level to "Debug"
-
Check System Logs:
- Monitor logs during a send
- Look for authentication or permission errors
Still Need Help?
If these steps do not resolve the issue, contact Propper support at support@propper.ai with the details listed under Support.
Support
Getting Help
- Documentation: Refer to this guide and the in-app help
- Setup Wizard: Use the guided Setup Wizard for configuration
- Propper Admin: Check the connection status and configuration
- Support: Email support@propper.ai, or reach the team through your Propper account
Preparing for Support
When contacting support, have ready:
- Salesforce org ID
- Your Propper account information
- Error messages or screenshots
- Steps to reproduce the issue
Appendix: Products and Resources
Products in this package
- Propper Sign: Send agreements for eSignature and track their status
- Propper Gen: Generate documents from templates
- Agent Add-On (optional): Send agreements and check status from an Agentforce agent